If you want to save the data view you’ve worked on, remember to save it as a favorite.
In this section
Working with data views
Types of data views
Configure a view with column format and display
Find and organize data with filter and sort
Reset, print, download and expand data views
Saving your work with favorites
Sharing your work with link sharing
Find the right data and create groups with filters
In Working with data views, you learned how to expose the hidden menu in a column header. Here you will build on that knowledge to use filters and find the data you are really interested in seeing. Filtering a column limits the number of rows you see to only those that match the filter you set. You can use filters on any column or combination of columns to zero in on the data you are most interested in.
Quick filters using the Filter box
The quickest way to filter a column is to start typing in the Filter box at the top of the column like this one on the Student Roster:
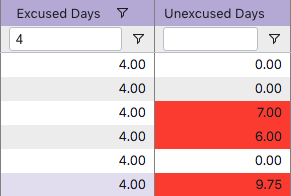
Here we entered 4 into the Excused Days column Filter box and instantly, the following happens:
- Only those records which contain the number 4 in Excused Days are now visible in the grid.
- A filter icon
appears in the Excused Days column header to indicate it is filtered
- A filter bubble explaining the filter appears above the grid and the row count for the grid changes to 100

Filtering excludes data that does not match the criteria you enter. By default, the Filter box executes a contains search, which is shorthand for saying: show me only those records where the data in this column includes the text I just typed. So by default, the Filter box executes a broad match search. In many cases, this may be all you need and you can combine filters by typing into any Filter box until you arrive at the data set you want. To remove a filter you can click the “X” in the filter bubble or clear the filter value displayed in the Filter box… While the filter box is easy and fast, you need to be more precise. Enter Advanced filters.
Advanced filters
With your mouse in the header of the column you want to filter, expose the column menu and click on it, select the Filter menu which is the top-right menu you will see and from there you will see a drop-down menu similar to the following:

The dropdown menu provides the Formula used to solve for the filter and is set to Equals, in this case, meaning anything entered in the Filter… field below will cause the grid to include on only those records where the data in that column exactly equals the contents of the Filter… field. The formulas available for advanced filters depend on the type of data in the column: text, numeric, date. For example, numeric and date filter formulas include tests for values greater than, less than, and in a specified range, to name a few. On the other hand, text filter formulas allow for things like equals, does not equal, contains, etc. Click through different types of column filters and give them a try.
Sorting records
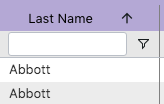
With your mouse over any column header (e.g. Last name) so the index finger cursor is visible, click on the header similar to the following:
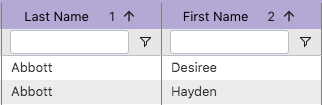
Every column can be sorted in ascending or descending order. Click the column again and you will sort descending. Click the column again and sorting will be removed. You can sort on multiple columns. To do that, hold down the shift key while you click. When data is multi-sorted, the column header will include a number to indicate the sorting precedence like so:
Some data views are built pre-sorted, especially on student name, to help you quickly identify the information you want. Certain types of school data, like grades, do not fit neatly into standard sorting algorithms. Don’t worry, we solve for those! For example grade levels will sort “naturally” for PK, K, 1, 2, 3… etc.
Having trouble?
Filtering is one of the most powerful features of Analytics but it can also raise questions. See if any of the following answers the questions you have come across.
| Issue | Resolution |
|---|---|
| I type in the filter but nothing changes, I still have the same number of rows. | There is no data in the column that matches the filter and formula. Try another value or check the formula menu. |
| I type into the quick filter and know I have matching data in my column and yet the filter does not work. | Check the formula menu. The quick filter does a Contains search by default but if the formula was set to something else, like Does not contain, it will stay that way until it is changed again. |